Friday, May 4, 2018

Cookin' with Jazz - Rich and Creamy Horchata Muesli


Horchata Muesli 

When I first realized the next Breakfast on the Patio at Namaste falls on Cinco De Mayo, the first thing that came to my mind is Horchata. 

Horchata is a Mexican drink typically made from rice milk, cinnamon and vanilla, and is simply delicious. My husband requests Horchata frequently as he likes to add it to his iced coffee. The only thing I don't like about Horchata is the amount of sugar added, so I decided to sweeten mine with dates, and made it vegan by using almonds and coconut milk. It is time consuming, but is so worth it. The result is rich and full of flavor - making the muesli extra creamy. 

Vegan Horchata (serves 4-6) 


1 cup white rice
1/2 cup almonds
1 cinnamon stick
1 can whole fat coconut milk
4 dates
1tsp vanilla 
1 1/2 cups almond or coconut milk
dash of salt

Directions: 

1. Start by soaking the rice, almonds, and cinnamon stick in water overnight. Once done soaking, drain out the water, rinse through, and add the ingredients to a blender. Blend on high with the canned coconut milk until well blended and frothy. 

2. Pour mixture into a cheese cloth strainer, or nut milk bag, and squeeze as much of the liquid out as possible. 

3. Add the liquid back into the blender, and blend with dates, vanilla, almond or coconut milk, and a dash of salt! 

4. Store in the fridge for about 3-4 days. 

Horchata Muesli (serves 2) 
1 cup oats
3 tbsp chia seeds
3 tbsp flax seeds
2 tbsp coconut flakes
1 tbsp almond or coconut yogurt
2 - 2 1/2 cups Horchata

Directions: 

1. Add all the ingredients into a bowl, and mix together. If you notice it's a little dry, you may need to add more Horchata. Keep in the fridge overnight. Enjoy with added fruit, nuts, seeds, and extra Horchata! 


BREAKFAST ON THE PATIO
Join us for yoga, community, and nutritious food! 

Saturday, May 5th from 10:45 - 11:15am. 
Free to those who attend class before or after. 
Reserve your spot online here.


SHARE:

Wednesday, May 4, 2016

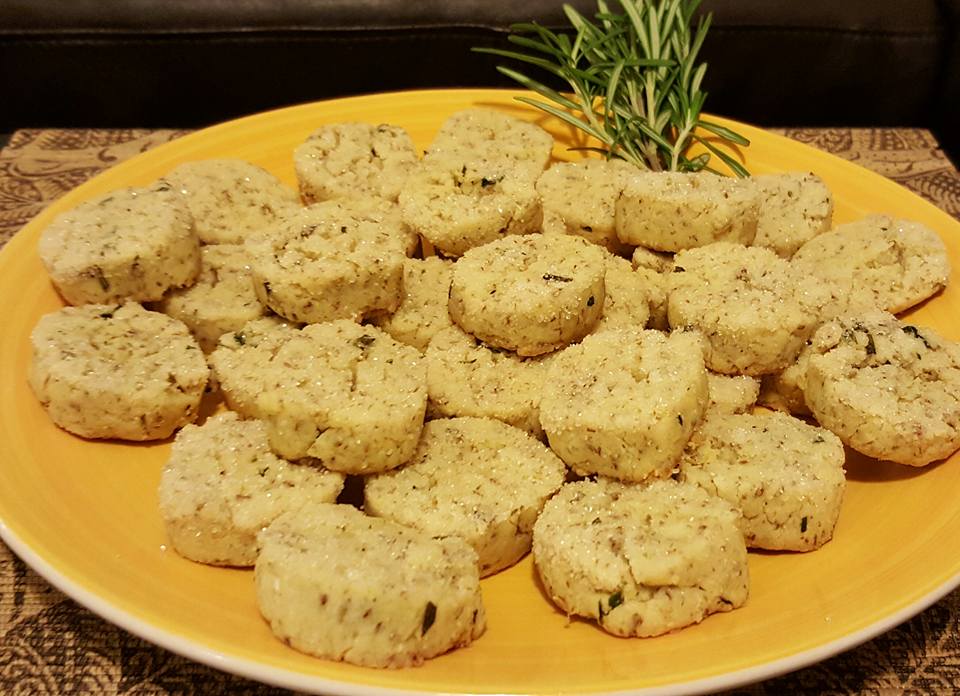
Community Recipe share: Hipster Biscuits

Another great share from our NHP community, check out Elizabeth Rosselle's blog, The Punk Sophisticate. She shares inspiring DIY projects, fashion, and even recipes like this one.

Elizabeth has been practicing with us since we opened our doors. You can regularly find her taking back-to-back classes, attending our gardening workshops, and chatting it up with our staff. She is one of the many students we are proud to grow with. Thank you for contributing so much to our community, Elizabeth!

We are particularly in love with this recipe as it uses our favorite ingredient: rosemary! We use rosemary throughout the studio to promote relaxation and memory. Here's a delicious way to incorporate it into your diet.


Lemon Rosemary Basil Hipster Biscuits via The Punk Sophisticate

¼ cup Earth Balance (I use the soy free Earth Balance. Whole Foods sells this)

¼ cup olive oil

¼ cup sugar

1 tsp finely chopped rosemary

1 tbsp finely chopped basil

½ tsp lemon zest

2 tbsp flaxseed meal + 3 tbs water (equals two egg yolks)

1 tsp vanilla extract

½ cup white rice flour

½ cup brown rice flour

⅓ cup almond flour

⅛ cup shredded coconut (unsweetened)

¼ tsp Xanthan Gum

1 ½ tsp Baking Powder

¼ tsp salt

Dust / Dip:

⅛ cup raw cane sugar

Mix well your flaxseed meal and water - set aside (re-stir if too thick after it gels)

Beat Earth Balance, olive oil, sugar, rosemary, basil, and lemon zest with electric mixer until creamy. Beat in flax/water mixture and vanilla.

Whisk together flours, baking powder, xanthan gum, coconut and salt in one bowl. Add to wet ingredients and beat until combined, or use hands to knead. Shape cookies into two 1-inch wide logs. If the batter is too dry and crumbly, add olive oil one tsp at a time. If it’s too wet, add more white rice flour one tablespoon at a time until consistency feels right. Logs should be firm enough to keep from collapsing but moist enough not to crumble. Wrap in wax paper or saran wrap and refrigerate for two hours.

Preheat oven to 325 deg F. Butter 2 baking sheets. Slice cookies into ⅓ in thick rounds. Press one side into sugar and place sugar side up on the baking sheet. Bake 15 min or until golden brown on bottom. Remove from oven and place very carefully on a cooling rack. Wait just a few minutes and then EAT! :)
SHARE:

Friday, February 26, 2016

Recipe Share: Easy & Delicious Anti Inflammatory Vegan Lunch

Citrus Cilantro Kale with Quinoa and Cauliflower

This recipe is a cinch and will leave you feeling nourished and light. 

Ingredients:
  • 4-5 Kale leaves, stems removed
  • 1/2 cup quinoa, cooked
  • 1/2 cup cauliflower rice, either processed on your own or purchased (Trader Joe's has premade cauli rice in the produce section!)
  • 1/4 cup EVOO
  • 1-2 tbsp cilantro (to taste)
  • 3 cloves garlic
  • 2-3 tbsp lime juice (to taste)
  • Salt & Pepper to taste
Instructions:
  • Steam the kale & cauliflower, either on the stove top or in the microwave, to your desired doneness. I recommend leaving a little crunch.
  • Combine kale, quinoa and cauliflower in a bowl.
  • Combine remaining ingredients in a blender & blend until combined.
  • Pour dressing over your veggies.
  • ENJOY!


SHARE:

Tuesday, February 16, 2016

Recipe: warm chia pudding with berry syrup


With nutrition, they say, "Fail to plan and plan to fail." This is especially true at breakfast-time, when it is easy to grab the quickest thing and be on your way. But, a healthy breakfast sets you up for less bloat and more energy for the rest of your day. We love this recipe for warm chia pudding, inspired by our student Jasmine, who is a personal chef.

The best part of this recipe is it is quick, easy, cheap and can be made in advance.

Ingredients:

  • 3 cups coconut milk (I prefer canned)
  • 6-8 tablespoons chia seeds
  • 3 tablespoons cinnamon
  • 1 tablespoon honey (or sweetener of your choice, optional)
  • 1/2 tsp vanilla (to taste)
  • 1 cup berries (I typically use organic frozen berries to save money and waste less)
Recipe:

CHIA PUDDING
  1. Chia pudding must sit for 3-6 hours. I recommend setting the pudding overnight in the fridge.
  2. Combine coconut milk and chia seeds in a 1 cup: 2 tablespoons ratio. If you prefer a more gelatinous pudding, you can use a 1:3 ratio. For this recipe, the 3 cups of coconut milk can be used with 6-8 tablespoons of chia seeds
  3. Add 2 tablespoons of cinnamon, 1 tablespoon of honey or syrup, and vanilla. 
  4. At this point, you have some choices:
    1. Place everything in a sealed container and shake it like a Polaroid picture. *This is the way I recommend because it is easy. No extra cleanup! I just combine everything in a mason jar and shake it up.*
    2. Whisk it all up in a bowl.
    3. Blend it with an immersion blender for a little smoother texture.
    4. Blend it in a blender for a very creamy texture, more similar to regular pudding.
  5. Set in the refrigerator overnight or for at least 6 hours. For the first few hours, turn the container upside down or whisk briefly every hour or so. You will notice the chia starting to expand and become like pudding nearly immediately. If you see clumps, give it a shake, a whisk or a flip. 
  6. This should hold you over for a few days to a week! You can enjoy a spoon or two for dessert or a snack anytime of day.
BERRY SYUP
  1. When you're ready for breakfast, place a pot on the stove at low to medium heat.
  2. Add 1 cup of berries of your choice.
  3. Continue to heat, stirring occasionally, until the berries release some water and soften. The consistency will be like syrup.
COMBINE

  1. Stir 1 cup of chia pudding in with the berries to make one complete serving. If you are cooking for multiple people, use 1 cup of berries and 1 cup of chia for each person. 
  2. Stir until the chia is warm. 
ENJOY
  1. Top with 1 tablespoon of cinnamon (to taste). You can add allspice, turmeric, a dash of sea salt, or any other seasoning you like. 
  2. You can top your chia pudding with granola, fresh banana, or be creative and add whatever you want!


SHARE:

Tuesday, December 8, 2015

Vanda's Veggieducken

Hats off to Vanda for creating this centerpiece to our yogi feast. The recipe she used can be found at Epicurious.com or in its entirety below.


Ingredients

  • 1 cup pecans
  • 1 (7 1/2"-long) zucchini
  • 1 (9 1/2"-long) globe eggplant
  • 1 (11 1/2"-long) butternut squash
  • 2 scallions
  • 2 garlic cloves, divided
  • 1 shallot, coarsely chopped
  • 1/4 pound shiitake mushrooms, trimmed, coarsely chopped
  • 1 tablespoon olive oil
  • 9 sprigs thyme, divided
  • 1 cup (2 sticks) unsalted butter
  • 1/2 teaspoon red pepper flakes
  • 2 tablespoons pure maple syrup
  • 2 large eggs
  • 1 cup finely grated Parmesan
  • 1/2 cup fine plain breadcrumbs
  • 6 tablespoons coarsely chopped parsley, divided
  • Kosher salt
  • 2 tablespoons mint, coarsely chopped
  • 1 tablespoon fresh lemon juice
  • Special equipment:
  • Kitchen twine


Directions

  1. Preheat oven to 350°F. 
  2. Toast pecans on a rimmed baking sheet, tossing once, until fragrant and slightly darkened, 10–15 minutes. Let cool, then coarsely chop and set aside.
  3. Increase oven temperature to 400°F. Line a rimmed baking sheet with aluminum foil.
  4. Cut zucchini in half lengthwise. Using a medium-size quick-release ice cream scoop or heavy spoon, scoop out insides, leaving a small divot down the center. Reserve zucchini filling.
  5. Cut eggplant in half lengthwise and scoop out insides, leaving a 1/4" border on all sides and creating a divot deep enough to fit zucchini halves inside. Reserve eggplant filling.
  6. Cut butternut squash in half lengthwise and remove seeds. Scoop out insides, leaving a 1/2" border on all sides and creating a divot deep enough to fit eggplant halves inside. Reserve squash filling.
  7. Using a fork, pierce insides of squash and zucchini halves. Using a sharp knife, make shallow crosshatch marks inside of eggplant, being careful not to pierce the skin. Trim scallions to match the length of the squash.
  8. Coarsely chop 1 garlic clove. Combine chopped garlic, shallot, mushrooms, zucchini filling, eggplant filling, and squash filling in a large bowl. Working in batches, pulse in a food processor until finely chopped.
  9. Heat oil over medium in a large skillet. Add vegetable purée and 3 thyme sprigs. Cook, stirring occasionally, until mixture begins to brown, about 5 minutes. Return to bowl and let cool.
  10. Meanwhile, smash and peel remaining garlic clove and combine with butter, red pepper flakes, and remaining 6 thyme sprigs in a small pot. Cook over medium heat, stirring occasionally, until butter is melted, then stir in maple syrup.
  11. Pluck out thyme sprigs from vegetable mixture. Stir in eggs, Parmesan, breadcrumbs, 3 Tbsp. parsley, and 1 tsp. salt.
  12. Place squash halves, cut side up, on prepared baking sheet. Brush inside of each with maple syrup butter and season with 1/2 tsp. salt. Using the back of a spoon, press 3/4 cup vegetable mixture into each half until interior is fully coated. Sprinkle with 1/4 cup reserved pecans.
  13. Nestle eggplant halves, cut side up, inside squash halves. Brush inside of each eggplant half with maple syrup butter and season with 1/2 tsp. salt. Using the back of a spoon, press 1/3 cup vegetable mixture into each half until interior is fully coated. Sprinkle with 1/4 cup pecans.
  14. Nestle zucchini halves, cut side up, inside eggplant halves. Brush inside of each zucchini half with maple syrup butter and season with 1/8 tsp. salt. Using a spoon, fill zucchini halves with 1/4 cup vegetable mixture, spreading it flat. Sprinkle with 1/4 cup pecans (reserve remaining pecans), then lay scallions down the middle.
  15. Cut 3 (18") lengths of kitchen twine. Slip twine under one squash half, then top with second squash half, so that cut sides face each other, and press down to seal. Tightly tie twine around squash to secure. Brush top with maple syrup butter (reserve remaining butter) and season with 1/2 tsp. salt. Wrap squash in aluminum foil and place in the center of the baking sheet. Using 2 loaf pans or small metal bowls turned upside down, keep squash secure on baking sheet.
  16. Bake until squash is tender to the touch, 1 hour 45 minutes–2 hours. Remove foil and let rest 20 minutes.
  17. Meanwhile, pluck out thyme from remaining maple syrup butter, heat over medium-low until warm, then stir in mint, lemon juice, 1 tsp. salt, and remaining 3 Tbsp. parsley.
  18. Place vegducken on a cutting board and cut into 1" slices with a serrated knife, transferring to serving plates as you go. Spoon herb butter over slices, garnish with remaining pecans, and serve.
Enjoy!
SHARE:

Friday, December 4, 2015

Shoshana's Maple Glazed Sweet Potatoes

In our series of recipes to warm you this winter, here is one from Shoshi: Maple Glazes Sweet Potatoes. Shoshana slightly altered this recipe from AllRecipes.com

Ingredients:
  • 2 1/2 sweet potatoes
  • 3 tablespoons coconut oil (you can use butter, but using coconut oil will make this vegan-friendly!)
  • 1/4 cup maple syrup 
  • 2 tablespoons brown sugar 
  • 2 tablespoons flaked coconut (optional) 
  • 1/3 cup chopped pecans
Directions
  1. Place sweet potatoes in a large saucepan with water to cover them. Bring the water to a boil, reduce heat, cover and let simmer 25 to 30 minutes until tender.
  2. Preheat oven to 350 degrees F. Grease a baking pan.
  3. When the sweet potatoes are cool, peel and cut them into large chunks. Arrange them in the baking pan.
  4. In a small saucepan, melt coconut oil, syrup, sugar and coconut together over a low heat. Cook for 3 to 5 minutes, stirring constantly. Sprinkle mixture over sweet potatoes. Top mixture with pecans.
  5. Bake 5 to 7 minutes, until top is lightly browned.
Enjoy!
SHARE:

Wednesday, December 2, 2015

Matthew's Roast Chicken

Our annual Thanksgiving Dinner turned into a true feast this year. With recipes spanning vegan, vegetarian, gluten free, sugar free ... or full carnivore, lots of gluten and tons of sugar, we had it all! We'll be sharing some of the delicious goodies with you over the this winter to warm you from the inside out.

Here is Matthew's recipe for roast chicken.


Ingredients:
  • 1 Whole chicken
  • 3 tbsp EVOO
  • 1 tbsp Salt
  • 1 tbsp Pepper
  • 3-4 tbsp Herbs of your choice
  • 4 lemons
  • 1 cup chicken or veggie stock
  • Root vegetables of choice, about a half pound
Cooking instructions:
  1. Preheat oven to 350 degrees
  2. Wash the chicken and remove anything from the cavity of the bird.  Rub the whole chicken with salt and pepper, crushed garlic and herbs (I like fresh oregano and thyme) and a bit of olive oil.
  3. Squeeze a few lemons on the chicken, reserve slices and place around the bird. 
  4. Cut 1-2 lemons in half and stuff those into the rear cavity.
  5. Add a touch of stock to the roasting pan with the bird and assorted veggies....i like carrots, potatoes and parsnips which will cook in the base as the chicken releases juices too.
  6. Roast @ 350 degrees in a covered roasting pan until the thermometer reads at least 160 in the breast, about 40-60 minutes.
Enjoy!
SHARE:

Friday, November 20, 2015

Creating Connection at Your Table

As human beings, we are constantly in search of connection. We want to connect with each other, and we want to connect on a deep level with something great inside of us and around us. An essential element of a yoga studio is facilitating an environment where connection is possible. It is no surprise, then, that a yoga studio owner has some inside knowledge of how to connect people through a simple dinner. Here are some tips from Vanda's table, where our teachers meet annually for a Thanksgiving Dinner.

  1. Less fuss and more fun. Keeping things simple is one way to make everyone feel comfortable. Rather than creating a 'formal' environment for our dinner, Vanda set a rustic table outside, lit by dozens of tiny lights and heated by a space heater and fire. The mismatched plates and chairs felt chic and intentional
  2. Let your guests participate. Playing host is fun, but most people love the chance to showcase their own contributions to a party. As your guests to contribute a side dish, dessert or bottle of wine (or non-alcoholic wine in the case of so many of our yoga teachers!). Allow your guests to share food with each other, and if they are not inspired to share food, guests can always contribute a playlist, some flowers for place settings or help wash the dishes. You may have heard it's bad form to allow your fiends to wash dishes at your house, but it's actually an intimate invitation to allow them to take a lead role even when in your home. So, when you're planning a party and someone asks to help, take them up on the offer!
  3. Plan one simple, shared activity. We've all been to those baby showers with game, game, game. Those parties feel like more work than simple connection, but it's also nice to make sure all your guests come together for at least one special activity. It can be a simple toast, photo slideshow, meditation or - in our tradition - a gratitude circle. As we share our gratitude for each other and our community, we immediately feel connected.
  4. Skip the "decorations" that will end up in a landfill and opt for simple additions to your table. Decorate your table with fallen branches or cut flowers from your yard. Opt for candles or colorful water jugs to add ambience. If you are going to purchase decorations, try to keep them simple enough that you can use them again and again. Our table was set with LED candles (buy them once and reuse them forever), jars of lavender, a simple burlap runner and rings of moss.
  5. Do you know Doodle.com? If you are planning an intimate dinner with less than 20 people, use this site to help pick a date. This is not feasible for larger groups, but it simplifies the planning process for smaller groups.
  6. Nothing is more important than good lighting and great music. 
SHARE:

Wednesday, November 4, 2015

2 Ingredient Organic Face Scrub


As we age, our skin stops turning over as quickly as it used to. This process makes it more important to exfoliate our skin to promote healthy turnover of cells. Here are some basics to help give your skin a healthy glow:

  1. Sleep! If you are tired, your skin will show it. Get at least 7-8 hours of sleep each night.
  2. Hydrate. Proper hydration will keep your skin "plump," while dehydration will increase the appearance of fine lines.
  3. Eat a healthy diet full of antioxidants.
  4. Put some of this antioxidants on your skin. This is where our recipe comes in for an organic, simply face and body scrub you can make with items you likely currently have in your pantry.
Coffee is one of the world's strongest antioxidants. It is also highly acidic, so it can be tough on the gut when consumed. Thankfully, we can use coffee in our beauty regimen to benefit from its potency. For this scrub:

Combine:
  • Organic olive oil
  • Fine ground coffee (I recommend fresh grinding to an espresso grain)
  • Ratio is 3:2 coffee to olive oil
Whisk
  • Whisk it up until it is the consistency of grainy mud
Scrub
  • It is messy! I recommend scrubbing in the shower or tub to keep things contained.
  • Apply liberally to your skin and rub in circular motions, careful not to press too hard, especially around the delicate skin of your eyes.
  • Rinse away.
Benefits
  • Coffee
    • Antioxidant
    • Rough grain is perfect for exfoliation
    • Subtle darkening of skin like a fake tan without the chemicals
    • Caffeine will constrict your blood vessels to decrease puffiness
  • Olive Oil
    • Incredibly hydrating
    • Don't worry about getting all of the oil off of your skin. Instead, allow a little to sit to encourage your pores to close back up after your scrub.
That's it! Your bathroom will smell awesome after this one.
SHARE:

Sunday, November 1, 2015

Sondra's Secret to Vitality


Disclaimer: This recipe is not vegetarian-friendly. We fully support efforts to eliminate animal cruelty caused by factory farming. 

The first time I told Sondra I wasn't feeling well, she said, "You need bone broth. Wait, you're not vegetarian are you? Of course you are."

At the time, I had been vegetarian for about five years. I was diagnosed with multiple auto-immune diseases a few years into my stint as a vegetarian, and doctors everywhere were telling me I needed to change my diet. My M.D., who is also an Ayurvedic doctor, told me I was eating wrong for my body type. My acupuncturist encouraged me to eat some meat to heat up my digestion, as vegetarianism is actually contraindicated in Chinese medicine. 

Sondra took one look at me and knew my dosha type - vata dosha - and knew it wasnt't being served by my diet. It took me some time to come around to the idea that some meat may help me heal. Once I did, I set out to find the healthiest and most responsibly sourced meats to add to my diet. Here is my experience making Sondra's prescribed "bone broth." As a recovering vegetarian, I'll warn you there is a chicken caracas involved. 

But, my theory has always been, if I'm going to eat the meat, I want to feel very connected with the animal and use its gift to the fullest potential. This recipe certainly does that.

Step One: Find a responsibly-sourced chicken

I recommend Healthy Family Farms which makes weekly visits to the South Pasadena Farmer's Market. From their website: "Healthy Family Farms is a sustainable, pasture-based farming operation in Santa Paula, California." You can even tour the facilities to see for yourself how the animals are raised. Animals raised in a pasture-based system are not only happier and healthier but serve the Earth they live on.

I purchased a half-chicken, bones and skin, for my recipe. If your farmer will sell you chicken carcass  (i.e., the left overs from their butchering), you can skip straight to step four. I enjoy using the chicken in my own meals first.

Step Two: Roast the chicken and enjoy it for a meal

I love a simple roast chicken. It helps connect me with the food I'm eating, which stimulates digestion and pays homage to the life given for my health. 

Here is my recipe:
  • Preheat oven to 200
  • Clean chicken and pat dry
  • Prepare a roasting dish with a tablespoon of olive oil or grass-fed butter
  • Dust the chicken in salt and pepper, rubbing in with your hands
  • Line the pan with chopped carrots
  • Rub minced garlic (3-4 cloves) over the chicken
  • Sprinkle thyme over the chicken
  • Pour a tablespoon of olive oil or grass-fed butter over the chicken
  • Roast for 30 minutes, covered at 200 degrees
  • Increase temperature to 400 degrees, roast for 30 minutes
  • Take lid off the roasting pan, watch for the chicken to start to brown
  • When internal temperature of the breast and leg have reached 180*, take the chicken out of the oven and allow it to rest for 20 minutes. It should continue to cook to 190* while resting.
  • Enjoy!
Step Three: Pick the bones

Pick the leftover meat off the chicken bones. If you have pets, this is a great add-in for their meals to give them some good fats and healthy protein. If you have some quality meat left over, it is excellent on salads and sandwiches for your week. You'll want to pick the bones relatively clean before making the broth. 

Step Four: Chop your veggies

You can add any veggies to your stock, but I recommend at least setting a base with aromatics. For one-half chicken, I recommend:

  • 3 large carrots
  • 1 head of celery
  • 1 medium onion. I replaced onion in my stock with leeks because I love their flavor in soups and broth.
  • Anything you have in your fridge! You can add mushrooms, radish or beets to your stock. 
  • Reserve part of the onion or leek if you'd like to add it to your broth as a finishing ingredient. I love some fresh leeks or green onion on soup. I also reserved some radish for topping
Step Five: Prepare your stock pot
  • Start by adding a very small amount of olive oil or butter to your pot, and turn the heat on to medium
  • Add your seasoning FIRST! This is an Indian cooking tip that will greatly improve your flavor profile. Here are some spices you can use:
    • Celery salt
    • Bay leaves
    • Oregano
    • Thyme
    • Ground pepper
    • Cinnamon (just a pinch)
    • Mustard seeds
  • Once your spices start to smell yummy, it's time to add your onion or leeks. Cook these down until just translucent.
  • Add the rest of your veggies, stirring with the spices for about 5 minutes
Step Six: Add the chicken bones
  • Add the chicken bones
  • Add enough water to cover your bones and veggies with at least a few inches to spare
  • Turn down the heat to low
Step Seven: Walk away
  • Stir about once an hour for 6-8 hours
  • Add water if needed
  • That's it! Drain your both over a strainer. The ingredients can be used again for a second stash. Your soup should have a healthy dose of collagen (i.e., should have a jello-like element to it). This is the beneficial part! 
Step 8: Enjoy warm

Spoon your broth as is into a cup for drinking or a bowl. The benefits of bone broth come from the collagen, which will help nourish you from the inside out. The warmth will stimulate your digestion and heat up your agni (inner fire). 

Step 9: But for real, what about the vegetarian/vegan folks?

We hear you, it's not easy eating meat. If you are adamantly veggie, you can still enjoy the benefits of broth. We recommend fermented vegetable broth for the biggest health benefits. You can find great stuff at Dave's Gourmet Korean, featured at the South Pasadena Farmer's Market (and others around town).

Enjoy!

Namaste,
Bethany

SHARE:
BLOGGER TEMPLATE MADE BY pipdig